GammaCrop
Free crop & local AI background removal for EufyMake E1 UV Printer
Drop Image Here
or click to browse local files
Supported: PNG, JPG, WEBP
GammaCropor click to browse local files
Standard blank fridge magnets (both 50×70mm rectangular and 57×57mm square) have rounded corners, but EufyMake Studio only crops to sharp rectangles. If you print a square-cornered image onto a rounded-corner magnet, ink oversprays past the edges, creating messy borders and wasted materials. GammaCrop solves this by letting you crop images with matching rounded corners before importing into EufyMake Studio.
Upload your image to GammaCrop, select your magnet size (50×70mm, 70×50mm, 57×57mm, or enter a Custom size in mm), adjust the corner radius to match your magnets, and export. The PNG exports at exact DPI with embedded metadata, so when you import it into EufyMake Studio, it auto-sizes perfectly — no manual adjustment needed.
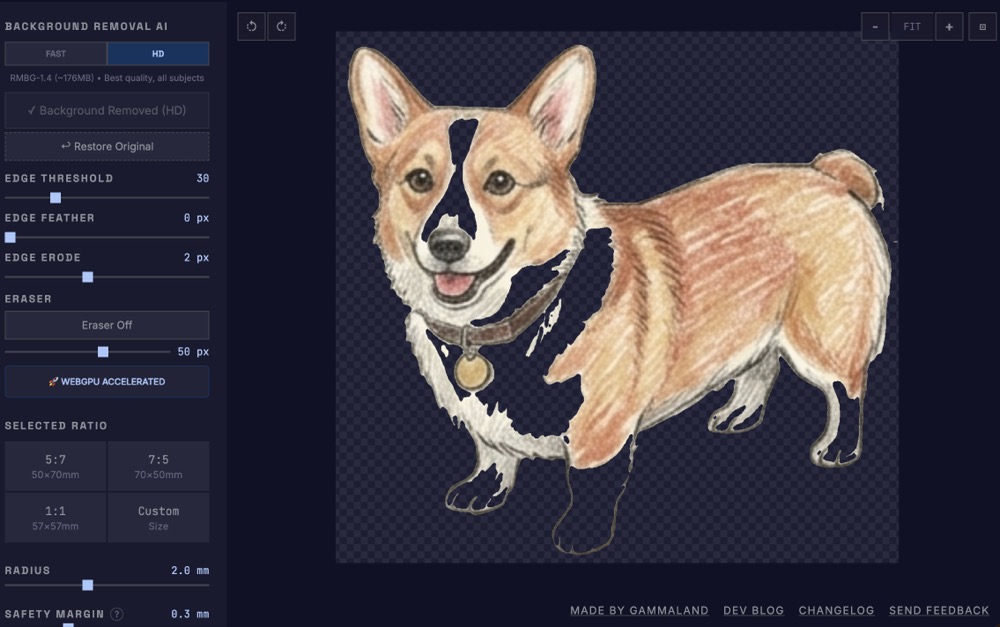
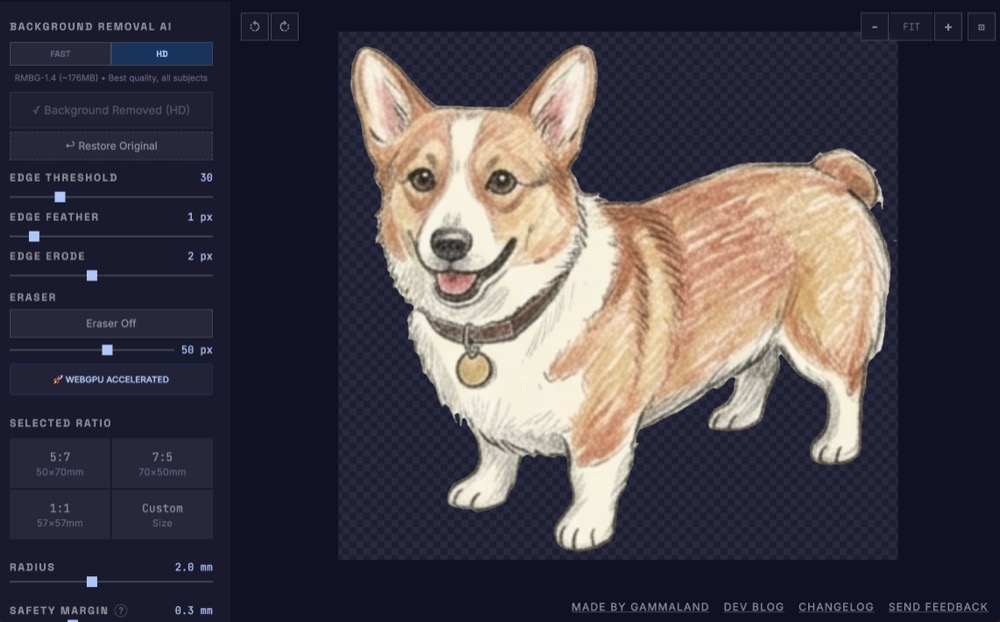
Yes. GammaCrop offers two AI background removal modes — Fast (MODNet, ~24MB) for quick results, and HD (RMBG-1.4, ~176MB) for best quality on complex edges like hair or fine textures. Both run entirely in your browser with WebGPU acceleration (or WebAssembly fallback). Unlike EufyMake Studio’s built-in remover (which costs credits and uploads to a server), GammaCrop is free, unlimited, and fully private — your images never leave your device. Works on desktop and mobile.
GammaCrop is 100% free with no sign-up required. Your images are fully private: all
processing (including AI background removal) happens locally in your browser, and no images are ever uploaded
to a server. Your settings are fully private: GammaCrop automatically saves your workflow
preferences (custom dimensions, corner radius, safety margin, etc.) using your browser's local storage
(localStorage). This data stays strictly on your device.
After removing the background, GammaCrop shows three edge refinement sliders: Edge Threshold (removes faint shadows), Edge Feather (softens edges with Gaussian blur), and Edge Erode (shrinks the mask to cut shadow residue). Internal holes inside the subject are auto-filled. For stubborn artifacts the AI missed, use the manual Eraser tool to paint them away. All adjustments are instant — no need to re-run the AI model.
600 DPI is the recommended baseline for high-quality EufyMake E1 printing. At 600 DPI, a 50×70mm magnet exports at exactly 1180×1652 pixels, which produces flawless photo-quality prints without visible dots. EufyMake Studio recognizes the embedded DPI metadata and automatically sizes the image perfectly.
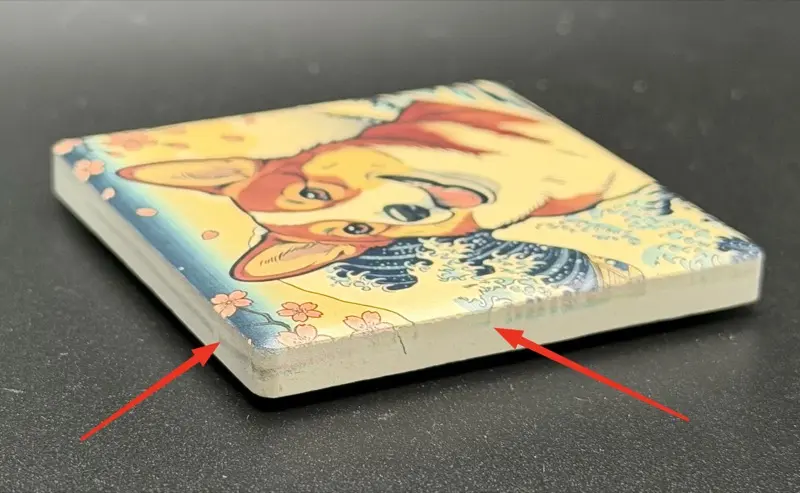
Safety Margin adds a thin transparent border (default 0.2mm) inward from the crop edge. UV printers like the EufyMake E1 can have slight alignment drift between prints — ink sometimes lands a fraction of a millimeter off-target. Without a safety margin, this drift pushes ink past the magnet edge, leaving visible ink residue on the print bed or on the magnet sides (see image below). The safety margin acts as a buffer zone: even if alignment shifts slightly, the printed area stays cleanly within the magnet surface. Read our deep dive on Safety Margins and tolerance stacking.
Conversely, you can set the margin to a negative value (e.g. -1.0mm) to add bleeding. This expands the image slightly beyond the magnet, ensuring edge-to-edge coverage. To keep your magnet edges clean from overspray, use our Reusable TPU Overspray Mask — it catches the excess ink around the magnet for a flawless print every time.

GammaCrop v1.11 adds a position controls toolbar (visible when hovering over the canvas) with five quick actions: Fill maximizes the crop to cover as much of the image as possible while maintaining the aspect ratio. Center centers the crop on both axes (or use Center H / Center V for a single axis). Reset restores the initial crop size, position, and zoom level. You can also nudge the crop 1 pixel at a time using arrow keys (↑↓←→), or hold Shift for 10-pixel jumps. Nudge buttons are also available in the toolbar for mouse/touch users.
If any edge of the crop extends beyond the image, that edge turns yellow as a visual warning — helping you avoid accidental transparent margins before exporting. The warning also accounts for negative safety margin (bleeding): even if the crop box itself is within the image, the bleed area extending beyond will trigger the yellow highlight.
If you want to try a small batch first, our Blank Ceramic Magnets on Etsy come in trial packs of 10 pieces (single size) or 5+5 mixed sizes — perfect for testing your workflow before committing. These blanks feature smooth rounded corners that match GammaCrop's default 2mm radius. For larger quantities, bulk packs (60/box) are also available from the EufyMake official store.